Faux Wood Truss Installation
These general instructions are being provided as a guide but do not address all installation scenarios.
Click here to start designing your custom truss system. After submission, a member of our Customer Experience and Design Support team will reach out to get your project started.
Please note that the truss systems from Barron Designs ship as components. In order to create the complete truss system, all beams will need to have final measurements and be trimmed/mitered to fit on site by the installer of your choice. Components needed for installation (mounting blocks, screws, tools, and other hardware) are not supplied by Barron Designs.
WARNING: Beams are for decorative purposes only. They are not to be used for structural support, bracing or suspension of objects.Instructions:
- Mark the installation location of the beams being installed using a laser.
- Install threaded eye screw(s)/threaded rod mount(s) into ceiling studs, at the point where the vertical beam(s) of the truss will meet the ridge/rafter beam(s). Secure cable/threaded rod to the mount.
- If using a ridge beam, install the ridge beam according to the Instructions for Installing Beams to the Apex of a Cathedral/Pitched Ceiling. During the installation, drill holes in the beam to accommodate the cable/threaded rod.
- Note the mount location of your cord beam.
- If your cord beam spans two walls:
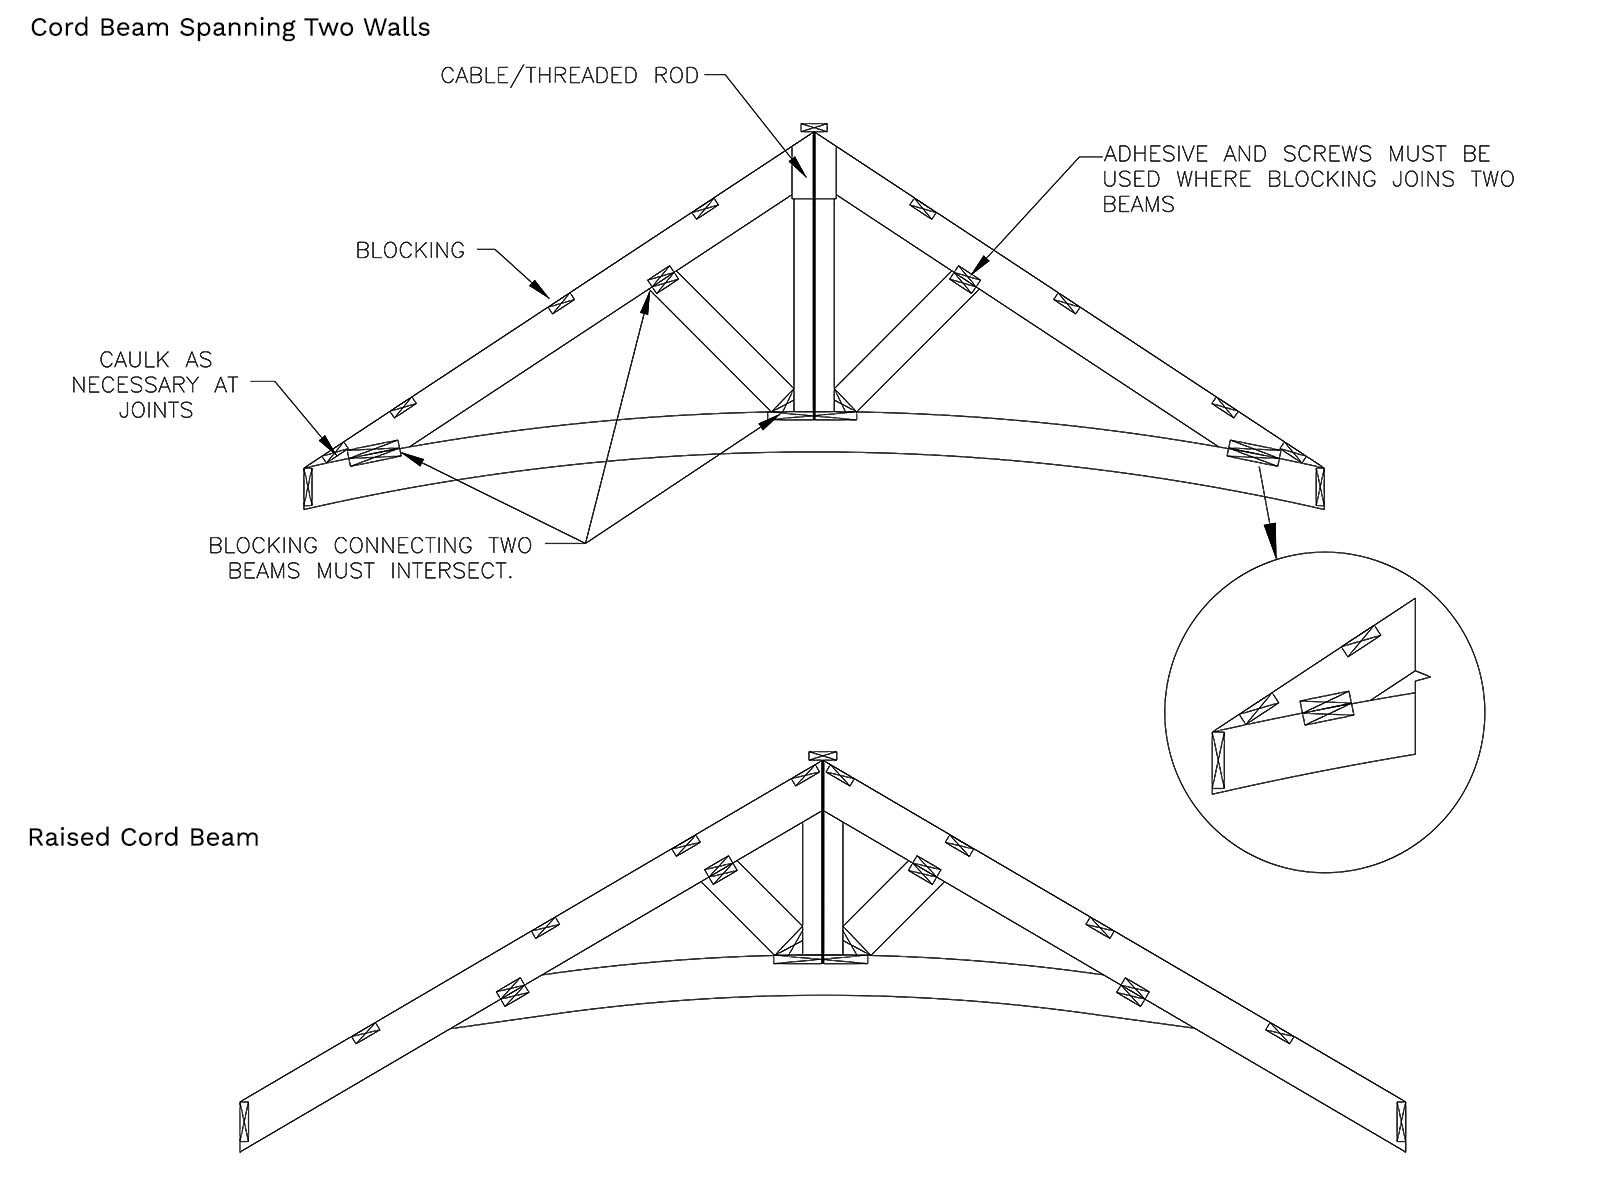
- Install the cord beam according to the Suspended Beam Installation guide. Wood blocking must be added to the inside of the cord beam at each joint. Note: If there is a 4th side to the cord beam it will be installed later in the process.
- Add an eye screw or threaded rod mount to the center of the cord support beam plumb with threaded eye screw(s)/threaded rod mount(s) installed in Step 2. Connect the cord support beam to the cable/threaded rod that was installed in Step 2. If cables are used, they should be taunt (utilizing a turnbuckle). If a threaded rod is used, fine tune the overall length by adjusting the nuts.
- Install rafter beams according to the Basic Installation Instructions.Prior to installation, wood blocking must be added to the inside of the rafter beam(s) at each point where the king post and strut(s) will meet the rafter beam(s).
- If your truss has a raised cord beam:
- Install rafter beams according to the Basic Installation Instructions.
- Prior to installation, wood blocking must be added to the inside of the rafter beam(s) at each point where the king post and strut(s) will meet the rafter beam(s).
- If you do not have a ridge beam, prior to installation, drill holes in the rafter beam(s) to accommodate the cable/threaded rod that was installed in Step 2.
- Install a structural block inside the center of the cord beam plumb with threaded eye screw(s)/threaded rod mount(s) installed in Step 2. The block(s) needs to span the interior of the cord beam, accommodate a threaded eye screw/ threaded rod mount and be well secured to the beam using trim head screws and glue. If the cord beam has a 4th side, install the structural block deep enough in the 3 sided cord beam so that the 4th side can sit flush when installed in Step 6.
- Connect the cord beam/structural block to the cable/threaded rod that was installed in Step 2. If cables are used, they should be taunt (utilizing a turnbuckle). If threaded rod used, fine tune the overall length by adjusting the nuts.
- Install rafter beams according to the Basic Installation Instructions.
- If your cord beam spans two walls:
- Install wood blocking to the interior of the beam(s) at all joints to facilitate toe screwing and gluing of the king post and strut(s).
- If the cord beam has a 4th side, install it by gluing it to the installed 3-sided cord beam.
- Measure the distance from the bottom of the ridge or rafter beam(s) to the top of the cord beam at the installation location(s). Cut the king post and strut(s) accordingly using a hand saw.
- Install king post and struts by gluing the 4th side to the 3-sided portion and toe screwing the joints to the wood blocking, installed in Step 5, to minimize separation
- Touch up by following the Touch up for Faux Wood Products instructions.
