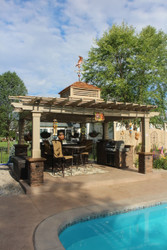
A customer of ours, Mike from Ohio, built a poolside pergola in his backyard using faux columns and panels from Barron Designs. Having worked with real stone before, he was excited to discover how good the faux version really looked.
Using Columns to Build a Pergola
As you can see in the photos below, he used Dry Stack columns with coordinating caps to create stone style bases on the posts supporting the structure. Inside of the pergola, the grill area is also enhanced with the use of the Dry Stack panels in the matching Earth color.
Pergola with columns accented with faux stone bases.
Mike’s experience in building a pergola is a great example of how our customers come to discover the practicality and design versatility of our panels.
Below, Mike discusses the four simple steps involved in his project.
Step 1. The website
Below, Mike talks about what led him to our website, and what he came away with:
“Although I have done real ledgestone projects in the past, I discovered the Barron Designs website, looking for a less time consuming and less expensive alternative to real stone.”
“In addition, I was concerned about adding tons of stone to the 6-inch stamped concrete pad, which was placed over backfilled ground...(due to the sloping nature of the original grade).”
“Being that I was totally unfamiliar with the product or installation techniques, the website was extremely helpful with demo videos and detailed specifications.”
“I called the company a couple of times for advice before ordering. Everyone was professional and eager to help.”
Step 2. Product Samples
Ordering samples in the finish you’re thinking of working with is an easy way to take a first look at the product, get an idea of the quality and durability they possess, and help you decide which one suits your preference. And as Mike notes below, when you place the order, the cost of the samples you purchased is taken out of your product order.
“The old adage is that ‘one picture is worth a thousand words’.......ordering samples took away any doubts that we had, concerning the quality, durability and real stone appearance. I ordered two different shades of the same panel, since it is better to see them in sunlight rather than photos on the computer.”
“The cost of the samples is subtracted when placing the order for your product.”
Step 3. Order Process and Shipping
For Mike, as for all our customers, the shipping of the products ordered is fast, and very easy. Mike even said that his product shipped ahead of the promised delivery date.
“Email notifications were sent alerting of shipments.”
As for the packaging, Mike said that “all panels, columns and caps were very well boxed and wrapped,” and that “no damage whatsoever occurred.”
 Grill inside the pergola covered with dry stack stone panels.
Step 4. Installation
With the specifications we provide for each product, installing them to fit your project’s parameters and sizing needs can be done easily and quickly. In Mike’s case, he built his columns using our specifications, which were treated lumber 2x4 boxes sheathed in OSB board.
“All of the 8 stone columns, bar counter and grill enclosure were covered with the stone finish in approximately one and a half days. This would have taken at least a week or more, with conventional stone.”
“I used a circular, jig saws and drill. I also recommend and used the touch up kit.”
“As far as constructing the 4 sided wood column bases is concerned, it is imperative that you don't make your boxes any greater than the specs. If you make the square boxes larger than specified, the four panel sides won't fit tight against each other, at the corners and a gap will be noticeable.
“I must mention that the column caps are very expensive looking and add a great touch to the finished project.”
Faux stone vs. real stone:
In addition to the above four steps Mike took to complete his project , he also expressed how cost-effective and DIY friendly our products are, as compared to real stone.
“The real thing is a little more than the panels per square foot. On top of that, you have much higher shipping/delivery costs with actual stone, not to mention the extremely labor intensive nature of using real stone. Mortar is another expense to be considered.”
As for the cost of installing real stone, Mike said that the going rate in his area in Ohio is $25 to $40.00 per square foot.
“Since this is our first Summer with the in-ground pool, we've had almost every relative, friends and neighbors visit....NO ONE knows that the product is not real stone.”
“We couldn't be more happy with the entire experience.”
Shop Related Products


