Basement Look Transformed with Faux Panels
How do you take your finished basement from ordinary to extraordinary? Barron Designs customer Lon Taylor from Atlanta, GA shared how he did it - covering his basement walls with the look of stacked stone.
Finished basements are one of the best things about American home building - offering families the chance to add playrooms, media centers, additional bedrooms or home gyms without building extensions. There's a massive industry built around 'finishing' basements to make them suitable for livable space - and many homeowners have incorporated our faux stone, wood or brick products in their basement projects.
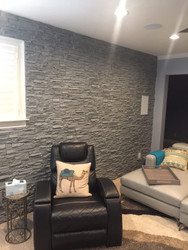
 Lon's faux stone finished basement looks terrific.
Lon wanted to make his basement's family room/home theater really stand out, beyond the traditional formula of sheet rock, drywall and suspended ceilings.
The best way he found to do this was to completely cover the basement walls with our Colorado Dry Stack Stone panels in Frosted Gray. The panels transformed the boring drywall into something truly eye-catching, and in keeping with the stacked stone walls you would find in the basements of historic homes.
"The basement transition to the new home theater/family room turned out great.The wall adds great interest and warmth to the room and we love spending time in it.Thanks for all the help." - Lon Taylor
 As you can see from this close-up, the Stacked Stone panels are vividly realistic.
As far as installation went, this was kind of a major project and it would be best to describe it as straightforward, rather than 'simple.' Just like we've described countless times before, the project began by installing each row of Stacked Stone panels, from the left to the right, trimming the final panel to fit flush with the wall. The panels mount directly to the drywall with construction adhesive and screws, and because they're made from lightweight and durable polyurethane foam, it's easy to trim them to shape with a regular wood saw.
The next row fits flush with the one beneath it, but as you can see from the pictures, Lon followed the faux panel best practice and 'offset' the next row by trimming the first panel in half. That ensured there was no repetition in the realistic stone texture from one panel to the panel above it - which is often one of the few clues that our faux panels aren't real.
 BEFORE: You can see how drab and unexciting the basement was beforehand.
Once that offset has been cut, the rest of the installation goes ahead as normal - once again, trimming the final panel to fit flush with the wall and then moving onto the next row above it.
If the height of the room is more than the height of three panels stacked on top of each other, a fourth row is made and in addition to trimming the edge of the final panel, the whole row is trimmed to fit flush with the ceiling above.
Boom - and there you have it: An entire wall of faux stone that's so realistic you have to walk over and touch it to prove that it's not real.
 Our accessory outlet cover really helped maintain the faux stone illusion.
Lon's project was not done there, though. One of the additional challenges was the fact that installing our faux stone panels would cover up the electrical outlets on the wall. Because our panels are easy to trim, it was simple enough to cut a square out to give access to the panel - but it looked displeasing and spoiled the realism of the faux stone wall. That's where our accessories come in - and Lon was able to buy matching grey outlet covers that fit flush with the hole he'd cut, and helped maintain the texture of the stone panels.
Finally, he purchased some color-matched caulk to touch-up any final details, and the job was done. You can see from the before and after pictures that the faux stone panels truly transformed his basement - and we're massively impressed with the results.


