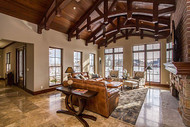
Painting unfinished faux wood gives you more control over how your beams or mantels blend with the rest of your room's decor. For example, if you have beautiful dark wood furniture in your home, you might want your beams to have a similar shade. Rather than choosing one of our factory-finished beams, you can select the unfinished style and paint it in a color that satisfies your design vision. This helps balance the look of your home’s interior—and it’s an easy process to learn and complete.
Painted Rough Hewn Faux Wood Arched Beams
What to Know Before You Paint Faux Wood
While you might think that painting faux wood is difficult or time-consuming, it's extremely simple, just like painting wood.
Painted Drfitwood Faux Wood Beams
You can paint faux wood beams and create a stunning ceiling design like this one.
Unfinished beams come primed so you can paint them in any color you want. We recommend taking an unfinished sample to your local paint expert for specific paint recommendations. Then, practice on your ceiling beam sample before adding paint to your actual beams. Remember to use only water-based paint, as oil or solvent-based materials won’t dry. In addition, use brushes, not rollers or sprayers, to apply your paint.
We also strongly recommend painting your beams before mounting them. It’s much easier and safer to work on the ground than on a ladder, where you’ll be forced to paint above your head.
How to Paint Your Beams
Follow these steps to paint your unfinished beams:
- Place the beam on a drop cloth and wipe away any debris or dust with a damp cloth.
- Mix your paint, dip your paintbrush into it, and remove any excess.
- Wipe the brush on a clean cotton cloth or cardboard scrap so that very little paint remains, a technique known as dry brushing.
- Brush the remaining paint onto the beam, going with the grain.
- Reload your brush as needed.
- Allow the paint to dry completely, and repeat the steps until you achieve the desired color.
After mounting your beams, you may need to touch up spots that were scraped or lost paint during installation. For additional information about painting unfinished beams, take a look at this page that details the dry brush method.
How to Add a Wash Layer
In some cases, you might want to add a wash layer of paint to your beams. This allows you to reach the desired depth of color while also highlighting the textures of the faux wood.
To create your paint wash, you’ll need to mix paint with water. The ratio depends on the desired thickness, but many people use one part paint to three parts water. Once your wash is ready, you’re ready to work through the following steps:
- Clean the surface with a damp cloth.
- Load the paintbrush with the wash and apply it to the wood in the direction of the grain.
- Use a clean, lint-free cloth to wipe away the excess paint, again following the grain.
- Allow the beam to dry completely and, if necessary, apply additional layers of wash.
Whether you opt to use paint or a paint wash, the finished results are sure to look fantastic. Once you’ve installed the beams, you’ll see how the results transform the look of your room.
Ready to start your ceiling beam project? Take a look at our faux wood ceiling beams. All of them offer an unfinished option!
Customer Faux Beam Painting Project Testimonials
Below are a few testimonials and design images from customers who successfully painted their beams.
Patrick stained his faux wood Arched Woodland beams for a beautiful truss ceiling design.
Patrick's stained Arched Woodland beams match his decor wonderfully.
These beams are very well engineered and assembled. I took my time performing all the measurements and cuts. Although I ran into a few screws while making the cuts to the arched beam, I was amazed at how well hidden the screw heads were. I had opted for the unstained version so I could customize the color. The staining process was easy and they turned out great. I previously purchased some beams with a more rustic grain. I matched the base coat of the arched beams and added a top coat so the stain color would match. It worked like a champ. I followed the installation instructions provided, and everything came out great! -Patrick G., Nebraska
Brenda was happy that learning how to stain faux wood was painless.
Brenda's stained Woodland beams are a great match for her kitchen decor.
The finished product looks great! We ordered the beams and we primed and stained them ourselves. It was easy and a fun project to do together. After they were installed in our kitchen, it made the whole room feel warm and cozy. I Love it! -Brenda, Santa Rosa, California
This customer couldn’t have been happier to discover how straightforward it is to paint faux wood beams.
Your beams made a perfect finishing touch to what could have been a pretty boring roof line in this home. I have attached some photos of the finished product. We stained these unfinished beams and put them through the great room and kitchen areas of the home. Including staining and finishing it took us about 2 days and was done just 4 days before the customers took possession. Nice product and great to work with. -Rick L., Edmonton, Canada
Cathy's faux wood mantel was so easy to stain that she decided to stain the corbels too.
We thought you might be interested in these pictures since they show a mantle used as a shelf on an entrance alcove wall. We love the look and were amazed at how well the mantle took the stain. Visitors can't quite believe two women installed it, as it looks so like the real thing and appears to weigh a lot. Thanks for a great product! -Cathy C., Fort Pierce, FL
Below are two other customers who were thrilled with the results of their stained faux wood beams:
They are truly a masterpiece when you add your own stains. –Nelson, Lake Worth, FL (no pic)
The faux wood mantel worked out perfectly. Very light, easy to work with and hang. Staining it was easy, I went with a gel stain. Everyone that looks at it thinks it looks real and are amazed when we tell them it’s not. –Lenny
Have you painted your unfinished faux wood beams? If so, we’d love to know how they look. Please send us pictures, if you have them, and tell us your story. We might even feature it here!
Shop Related Products


